MOCREO Device Setup Guide
Setup Your Device
Choose your device below based on its mounting method to find the specific setup guide.
📡 Smart Hubs (Gateways)
Desktop / Wall Mount
Flexible placement options depending on your environment.
Direct Plug-in
Zero-footprint installation. Plugs directly into standard wall outlets.
🌡️ Sensors
Velcro / Adhesive Mount
Method: Uses 3M Adhesive Velcro. One strip on wall, the other on sensor back.
Hook / Wall Mount
Method: Hanging via built-in loop (LS series) or direct screw mounting (LB1).
LB1 (Coming Soon)
Flat Surface Placement
Method: Stable structure for direct placement on desks or floors.
This section addresses common deployment scenarios, waterproof capabilities, and best practices for installation locations.
🛡️ Waterproof Capabilities & Protection
Although most MOCREO temperature sensors are designed for use inside refrigerators or freezers, the sensor body itself often does not have high waterproofing capabilities. Therefore, it is generally not recommended to place the sensor body directly in environments with high relative humidity without protection.
-
Non-Waterproof Models (ST5, MS1, LS2 body, etc.): These standard sensors do not have waterproof capabilities. If monitoring high-humidity environments (refrigerators, greenhouses, hot tubs), you must:
- Only place the external probe in the environment and keep the body outside.
- Or, if placing the body inside, use a waterproof bag with desiccant.
-
Waterproof Models (LS1, LW1, etc.): These sensors feature an IP67 waterproof and dustproof rating.
- Note: This offers protection against splashing and temporary submersion, but continuous long-term immersion is still not recommended unless specified.
❄️ Refrigerator/Freezer Deployment Guide
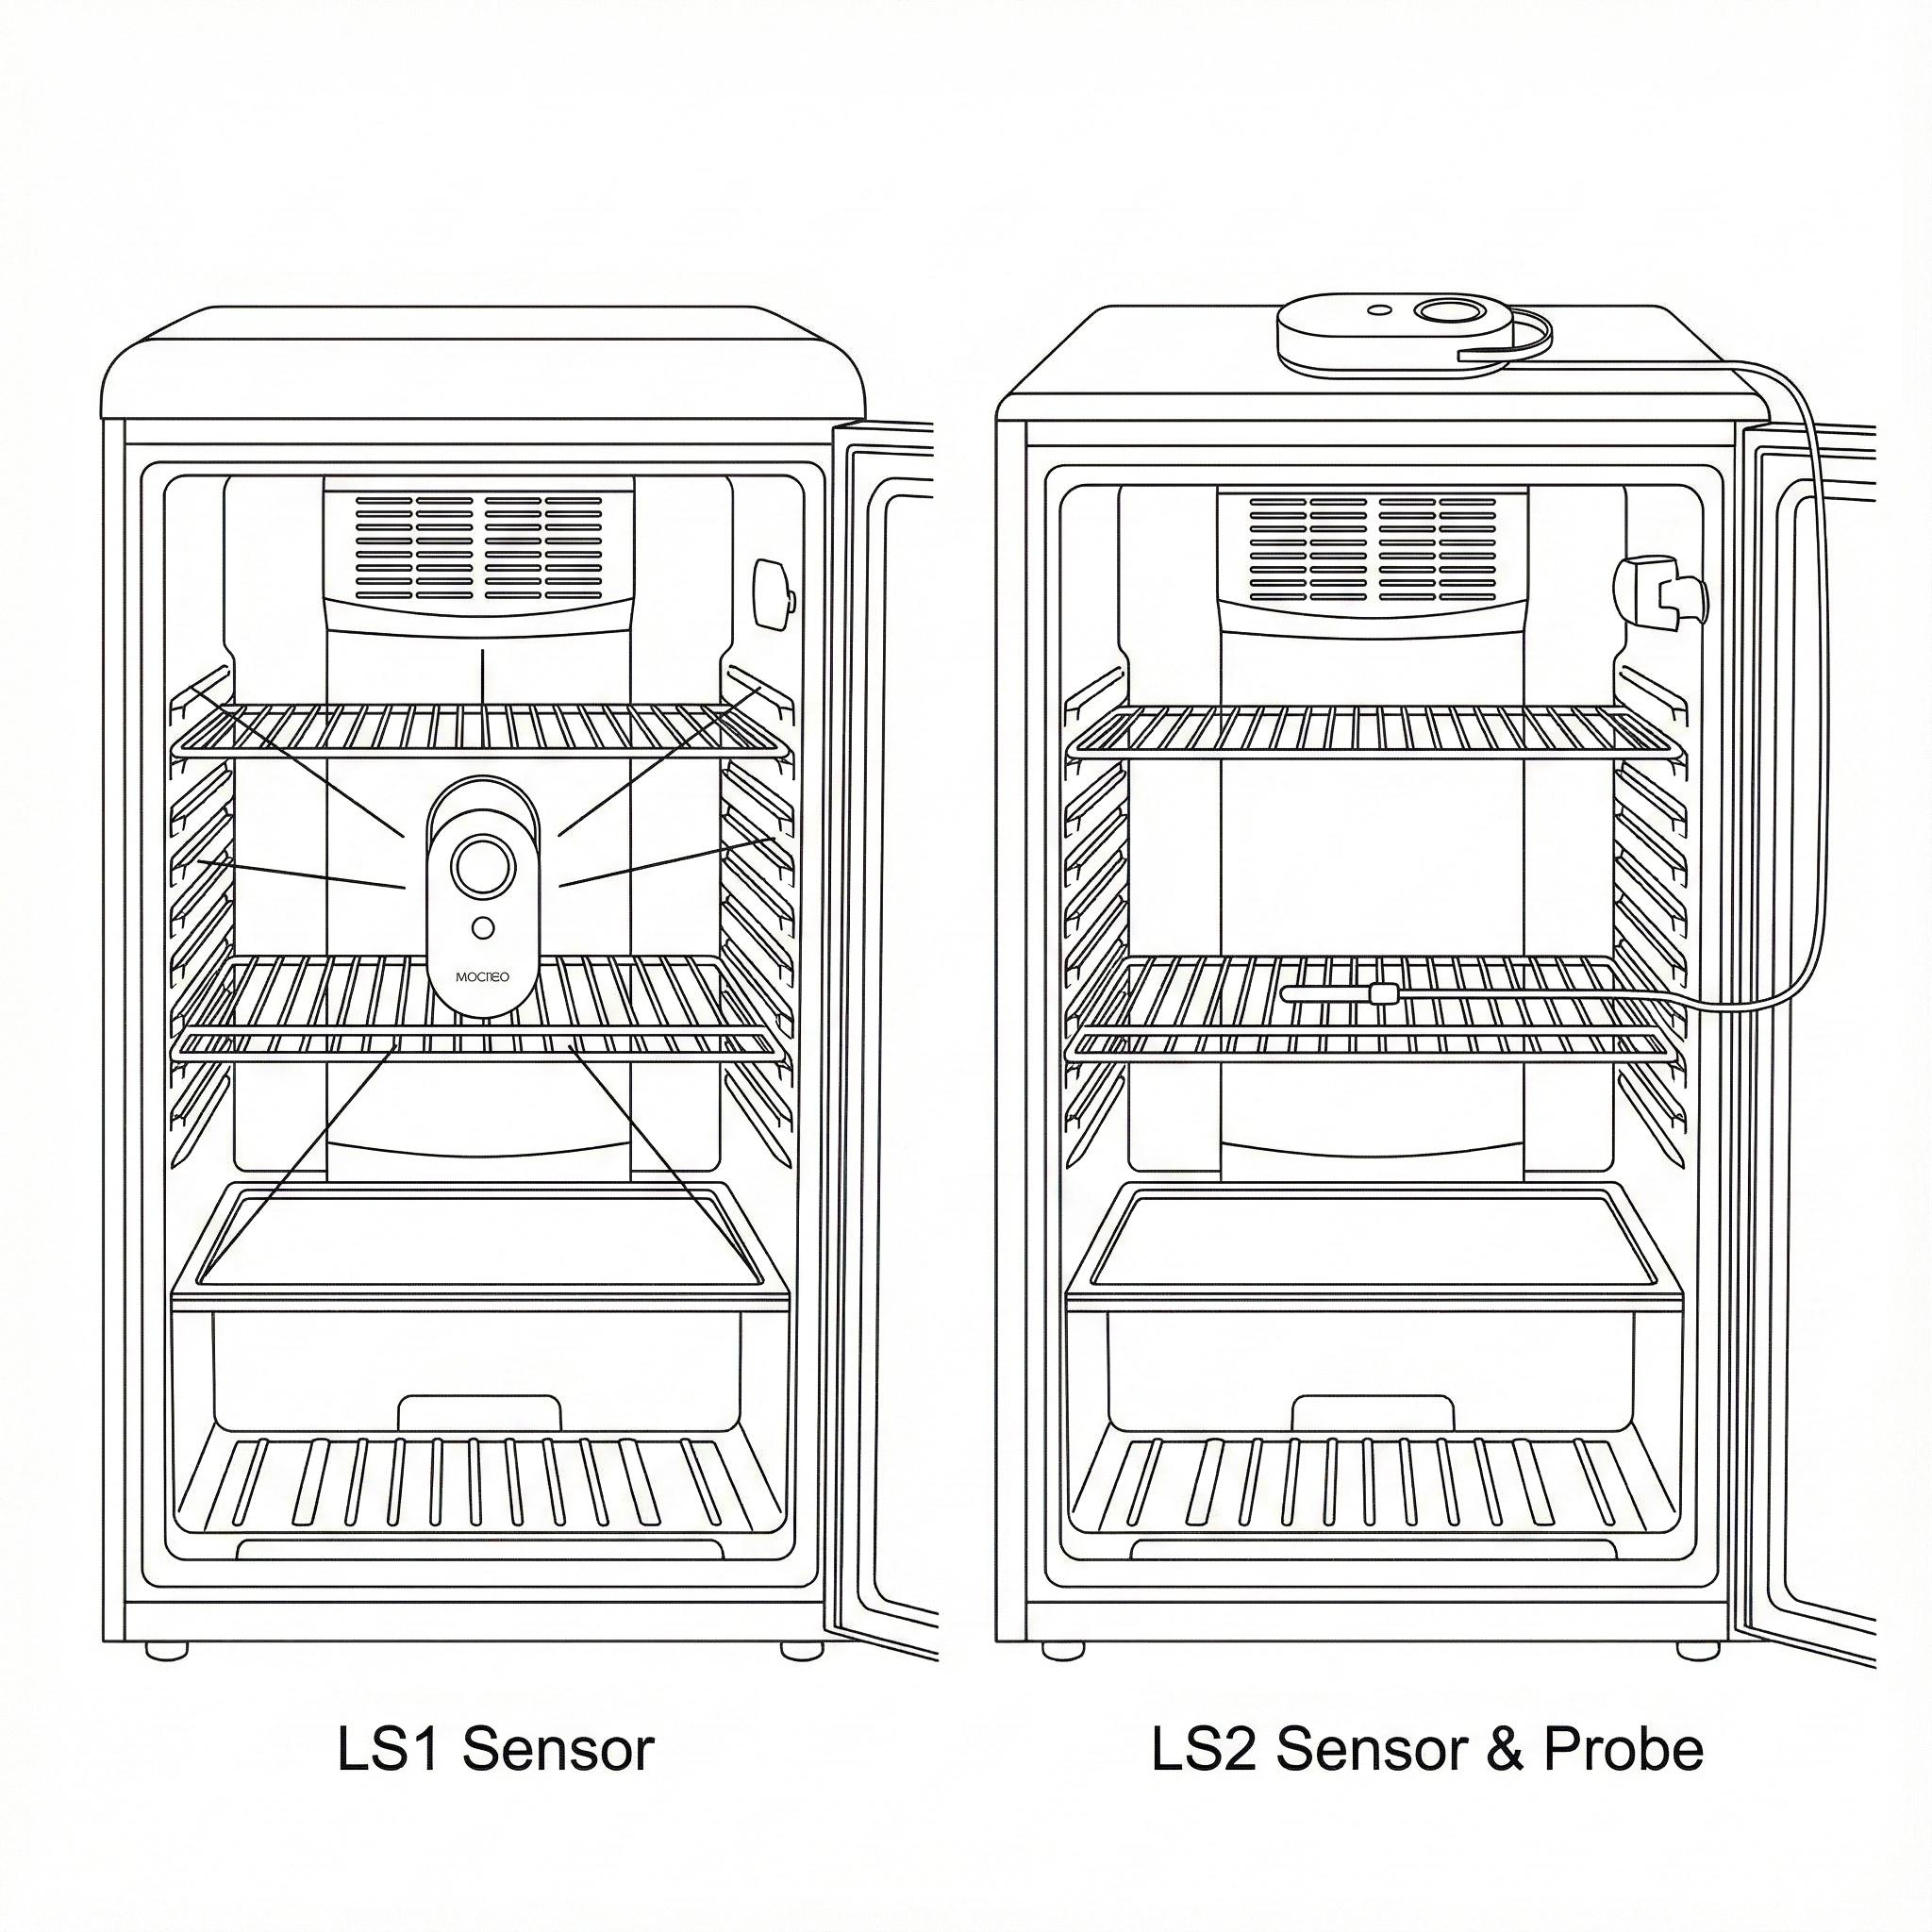
Scenario A: Sensor with External Probe (Recommended)
For sensors equipped with external probes (e.g., ST5, ST9, ST10, LS2), this is the safest method: 1. Place the external probe inside the refrigerator/freezer. 2. Keep the main sensor body outside the appliance (e.g., magnetically mounted on the side).
Tip: A MOCREO user has created a magnetic mount box for ST series sensors to help mount the body neatly.
Scenario B: Sensor Body Inside (When Necessary)
If the external probe cable prevents the refrigerator door from sealing properly, or you are using a sensor without a probe (e.g., LS1), you may need to place the entire sensor inside.
⚠️ Crucial Protection Steps: Since internal hardware is sensitive to moisture condensation: 1. Waterproof Bag: Wrap the sensor body in a sealed waterproof bag. 2. Desiccant: Place food-grade desiccant packets inside the bag to absorb internal moisture.
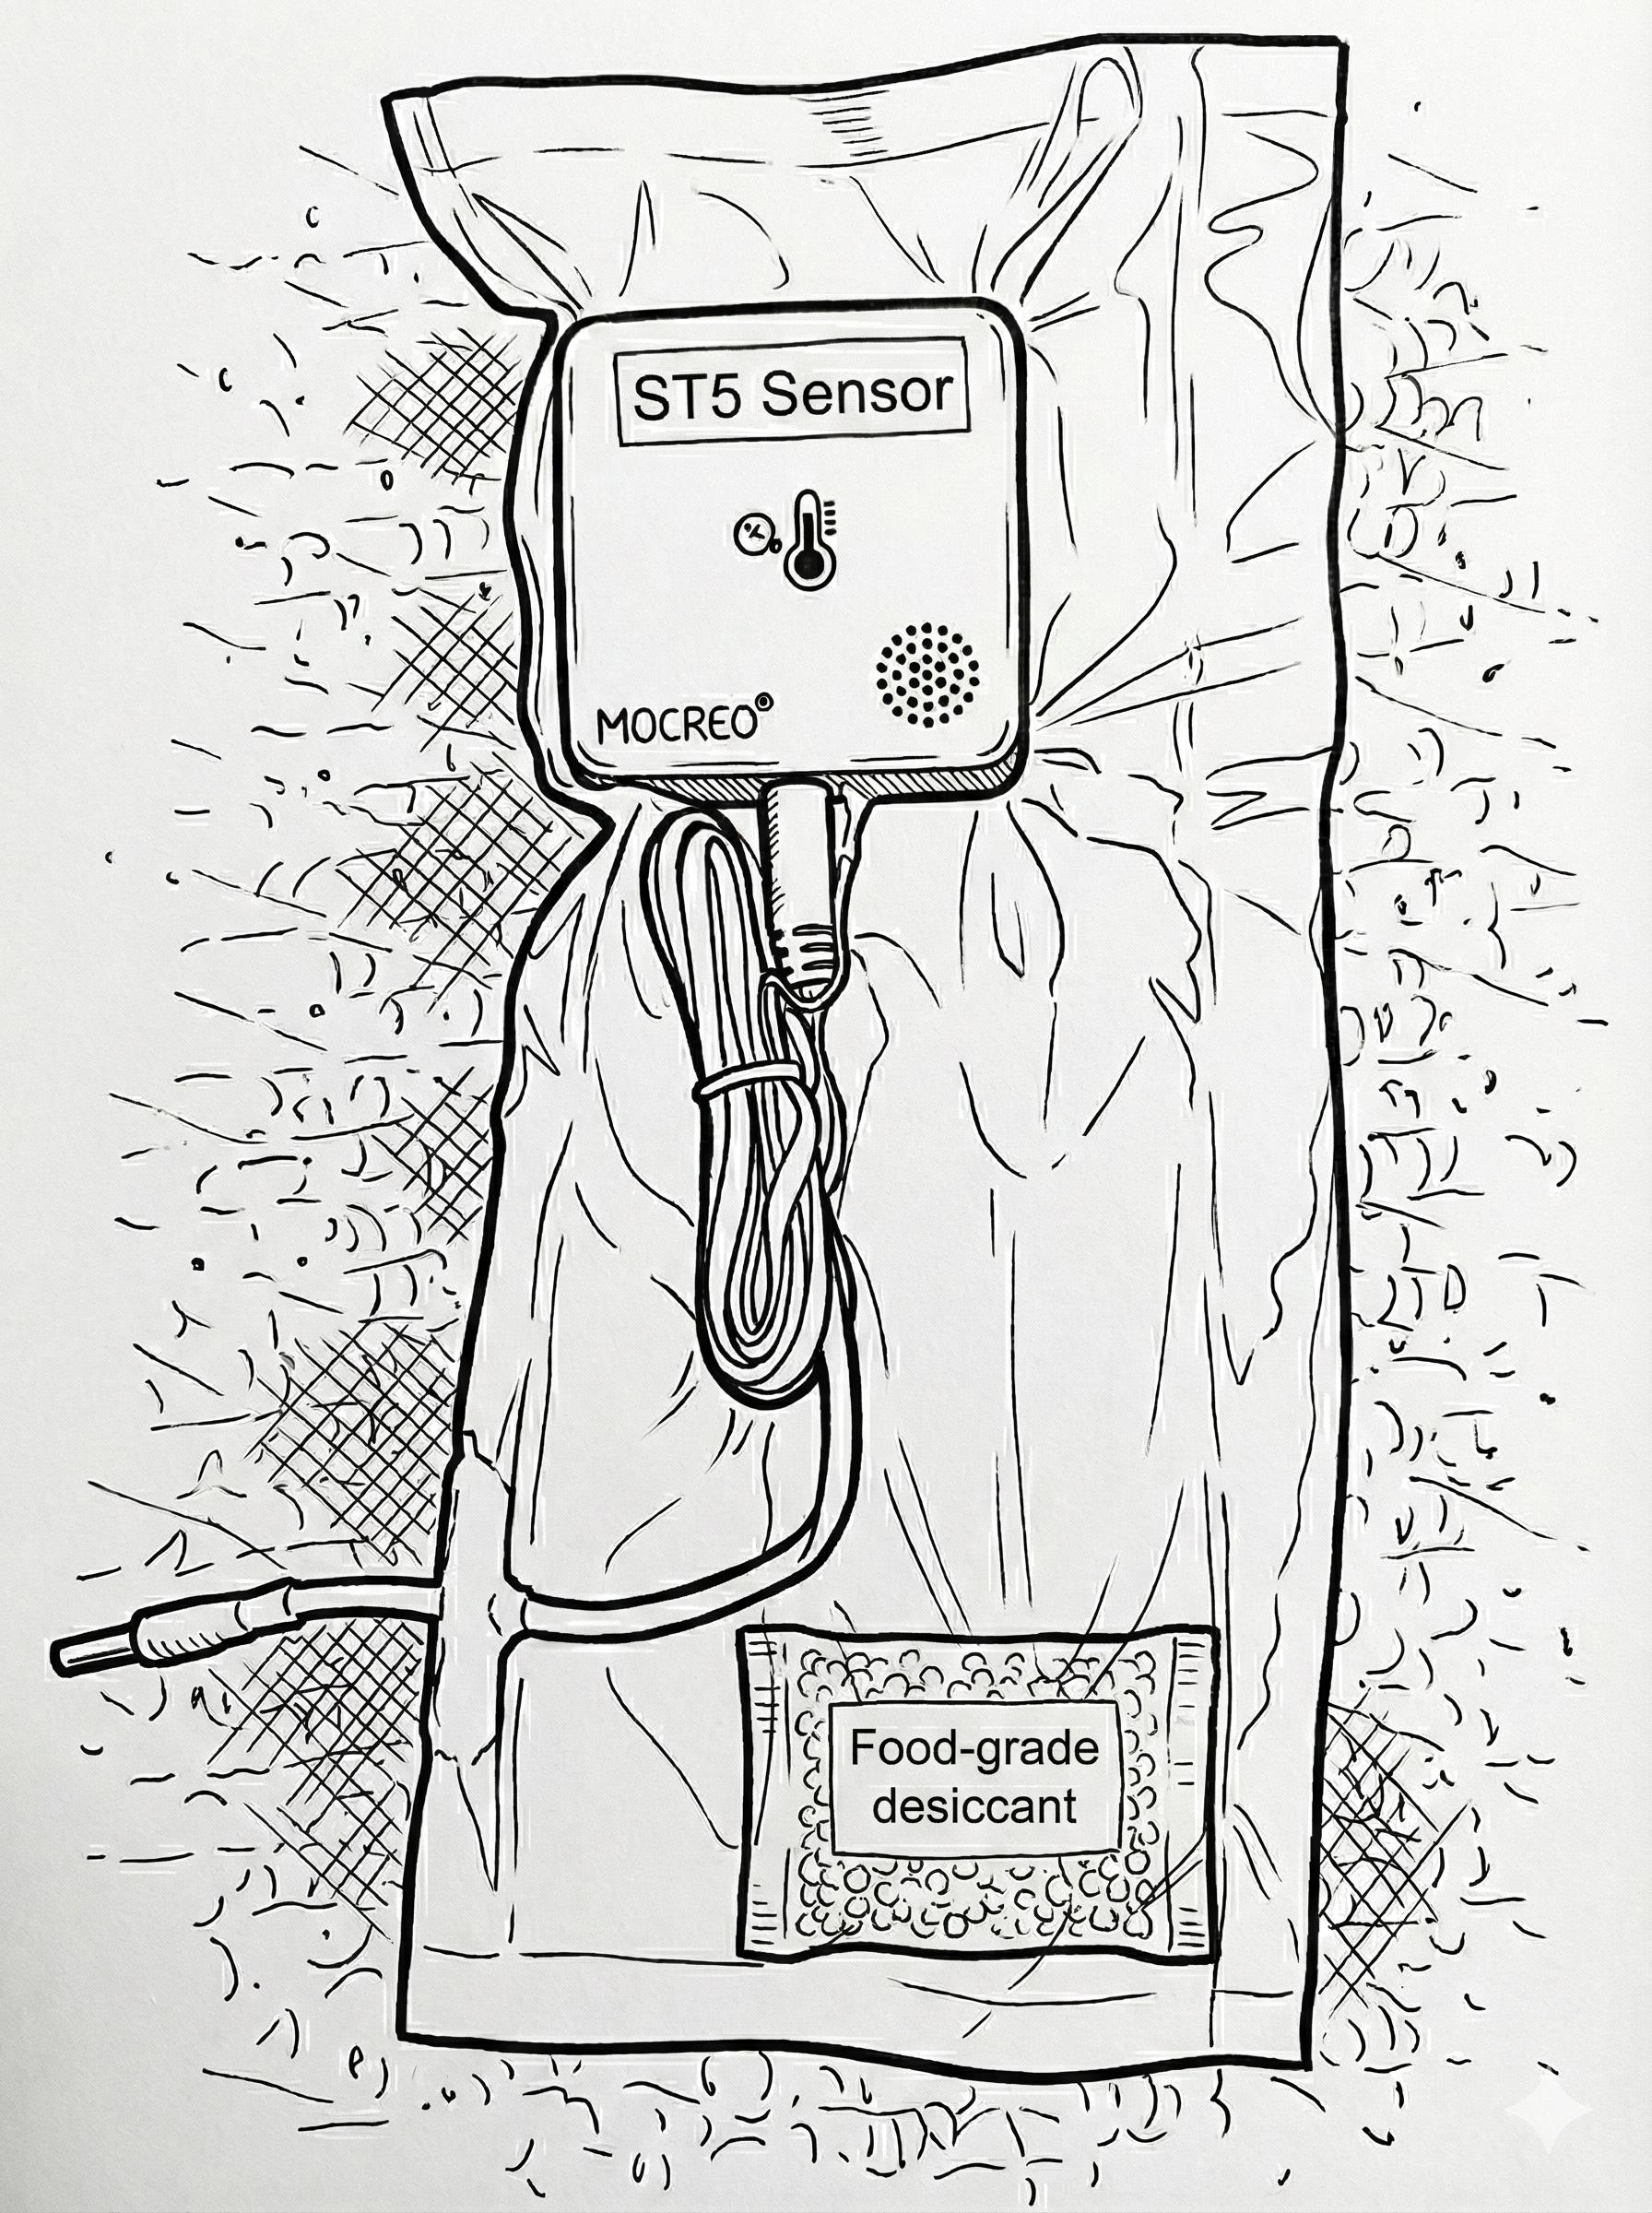
Risks to Consider: * Communication: Metal walls of fridges/freezers significantly block wireless signals. Range will be reduced. * Battery: Low temperatures (especially < -4°F / -20°C) reduce battery performance and lifespan.
Optimal Placement Inside Fridge
- Center it: Place in the center of the middle shelf/space for the most accurate average temperature.
- Avoid Hot/Cold Spots: Keep away from direct-cooling evaporator walls (too cold) or air vent outlets (fluctuating airflow).
- Avoid Contact: Do not let the probe/sensor touch food items directly to prevent false readings.
📡 Hub & General Installation Recommendations
To ensure stable connection and accurate data, follow these general placement rules:
1. Signal Connectivity
- Hub Position: Place the Hub (gateway) in a central location between your Wi-Fi router and where your sensors are distributed.
- Elevation: Place the Hub on a desk or shelf, not on the floor. Higher positions generally offer better signal coverage.
- Avoid Obstacles: Keep the Hub away from large metal objects (cabinets, machinery) and heavy concrete walls which block signals.
2. Environmental Interference
- Avoid Direct Airflow: Do not place temperature sensors directly in front of A/C vents, heaters, or fans.
- Avoid Sunlight: Direct sunlight will cause temperature readings to spike artificially high.
- Avoid Heat Sources: Keep sensors away from electronics, lamps, or appliances that generate heat.
🚀 Quick Start
First-Time Setup Process
- Download MOCREO App - Download and install the MOCREO app from the app store
- Register Account - Create your MOCREO account
- Select Product - Choose the corresponding setup guide based on your device model
- Follow Steps - Complete device setup by following the steps in the guide
- Test Connection - Ensure the device is working properly
Pre-Setup Preparation
- ✅ Ensure device has sufficient battery
- ✅ Ensure mobile network connection is stable
- ✅ Have device manual ready
- ✅ Ensure you're within device signal coverage range
🔧 Common Issues
If you encounter problems during setup, please check:
- FAQ Page - Frequently asked questions
- Device Setup Issues - Device setup related problems
- Sensor Setup Issues - Sensor setup related problems
- Error Code Explanations - Error code explanations
📞 Need Help?
If you encounter any issues during setup:
- 📧 Contact us for technical support
- 🌐 Visit the MOCREO official website for more help
- 📖 Check the product manuals for detailed technical documentation